
5. Advanced Data Acquisition
5.1. Camera Controls
Control of the imager can be controlled from two windows: the Camera tab in the Tools Panel, and the
Preferences window (accessed by File  Preferences).
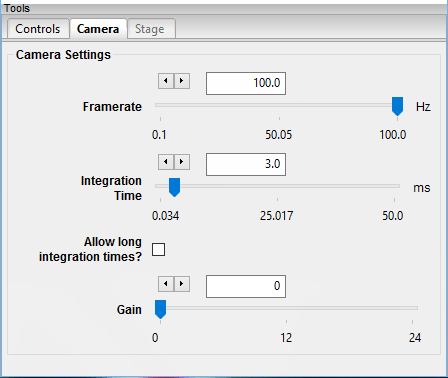
Camera tab in tools window
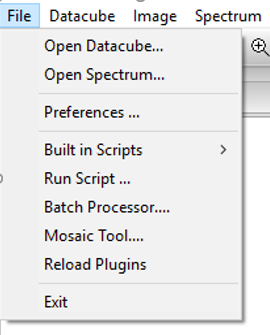
When the Preferences window opens, select the tab for your specific Pika imager (Pika L, Pika XC2, Pika NUV, or Pika NIR). The options for different Pika models will vary.
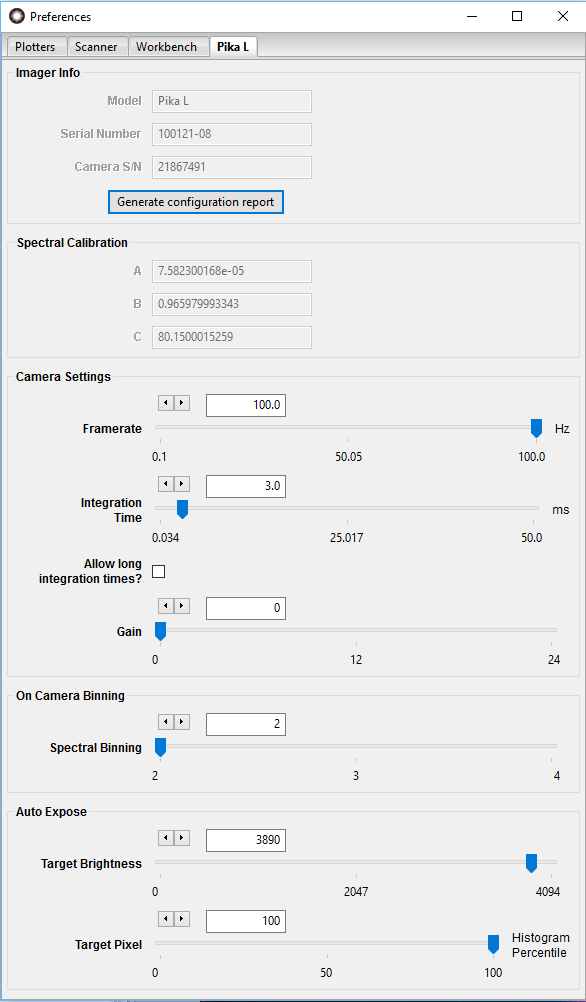
Pika L imager tab in Preferences window
5.1.1. Basic Camera Controls
Integration Time (also known as Exposure Time) is the duration of data acquisition for each individual line image.
If you use the Auto Expose button in the toolbar  , the integration time will be adjusted automatically
for your lighting conditions such that there are no saturated pixels in the image. Make certain the reflectance calibration
tile is being imaged when using this option.
, the integration time will be adjusted automatically
for your lighting conditions such that there are no saturated pixels in the image. Make certain the reflectance calibration
tile is being imaged when using this option.
Frame Rate is equal to the number of images acquired each second, and limits the maximum integration time (Max Integration Time (seconds) = 1.0 ÷ Frame Rate). If you do not have enough light, decreasing the frame rate will enable a longer integration time.
Gain is a factor which increases the signal, but at the expense of Signal-To-Noise ratio, in units of dB. We
recommend that you operate at low Gain values (preferably zero) to minimize noise. However, for
situations where you need to operate at high frame rates and need more signal, you may increase
the Gain manually. The Auto Expose button in the toolbar
will always set the gain to zero. (Note: The Pika NIR camera does not have a Gain control tool.)
Hint
When adjusting the camera settings, you may observe the effects of your adjustments in live view. To do this, click on the focus  button.
Note
If you observe broken or torn images when recording data at high speeds, you may be able to eliminate this problem by collecting data at slower speeds. These errors may occur due to a number of shortcomings within the data acquisition system including limitations in disk-write speed, chipset, motherboard bus speed, and CPU speed.
5.1.2. Spectral Calibration Values
As discussed in Chapter 3 (System Assembly), the spectral calibration values should be set by the factory when you receive your hyperspectral imager. The values are provided on a paper calibration sheet with your imager. Contact Resonon support if you have lost your spectral calibration values.
5.1.3. Auto Exposure Parameters
Spectronon features a user-configurable auto exposure algorithm that can be controlled in the camera settings tab. Two parameters are available: Target Brightness and Target Pixel. During the auto exposure routine, Spectronon calculates the histogram of pixel brightness of each frame. It then iteratively adjusts the integration time such that the histogram percentile represented by the Target Pixel parameter is at least as bright as the Target Brightness, but is not saturated. For example, if the Target Pixel is equal to 100% and the Target Brightness is equal to 3890 (the default settings for 12 bit cameras), the algorithm will attempt to find an exposure time such that the brightest pixel has a brightness of at least 3890 but less than 4095 (saturation). Similarly, if the Target Pixel = 95%, the pixel that represents the 95th percentile of total brightness will be targeted in each frame, instead of the brightest pixel. Selecting a Target Pixel less than 100% may cause the brightest pixels to be saturated, but may be useful for achieving desired exposure when features of interest are not the brightest in the field of view). For typical conditions, Target Pixel is set to 100% and Target Brightness is set to 95% of the camera’s bit depth.
5.1.4. Binning of Hyperspectral Data
Binning involves combining data from multiple adjacent pixels into a single data point. Binning reduces overall data volumes and increases SNR, at the expense of decreased resolution. Binning is possible in the spectral dimensions only.
There are two types of binning. One type is software binning, which occurs in Spectronon, and is available on all systems. The other type is hardware binning, which is available on the Pika L, Pika XC2, and Pika NIR. Hardware binning has the advantage of decreasing data volumes and increasing SNR. See the below table for more information on the affects of hardware binning with the specific imagers.
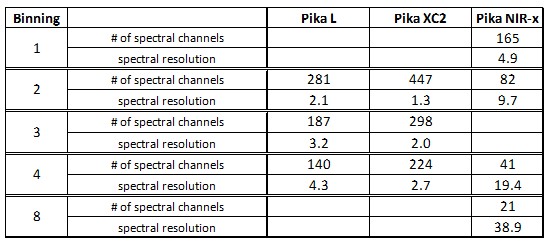
It is preferable to bin with hardware than with software, which will utilize fewer CPU resources.
Software binning is available on the Scanner tab in the Preferences window, see section 5.3.1 below. Hardware binning controls are accessed through the appropriate imager tab in the Preferences window. The On Camera Binning shows the available spectral binning values. These values may vary between imager models.

Pika XC2 imager tab in the Preferences window
5.1.4.1. GigE Connection Setup
The Pika II imager with GigE connection requires some additional steps for complete setup. If you purchased your computer from Resonon, these steps may have already been completed for you.
First, enable jumbo packets for your network adapter in Windows. In Windows, click the start menu, right click on My Computer, and click the Manage option. Click on Device Manager in the left column, click on Network Adapters in the middle column, right click your wired network adapter and choose Properties. In the Advanced tab click Jumbo Packet and set the Value to ~9014 Bytes. Click OK and close the Computer Management window.
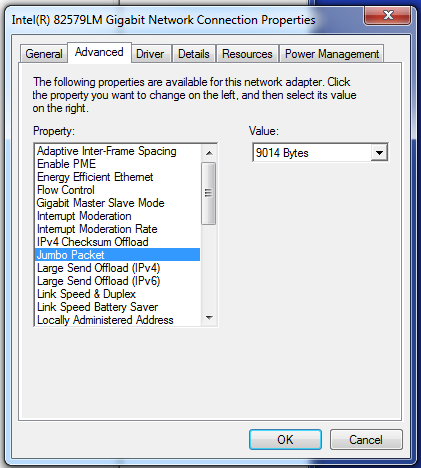
Device Manager - Network Adaptor - Jumbo Packets
In Spectronon, two additional settings will appear under the subgroup “GigE Properties”
in the Pika II tab under the File Preferences… menu: Packet size
and Packet Delay. These settings allow for management of bandwidth between the camera and the
controlling computer. The settings selected here will, in part, determine the achievable framerate.
Larger packet sizes require less CPU usage to transfer a given amount of data from the camera to
the computer than small packet sizes. The maximum packet size is limited by your network adapter,
any other network hardware, and the camera. Typically, the largest available packet size is recommended.
The packet delay sets the gap between data packets transmitted to the computer from the camera, and allows for time for the CPU to process the data it has received before new data is transmitted. If your scans result in dropped frames, try increasing the packet delay (which will impact the maximum framerate achievable).
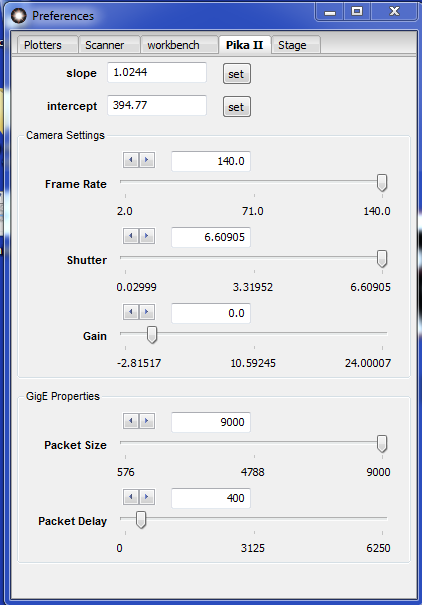
Pika II imager tab of the Preferences window
Typically problems with these settings will manifest as image inconsistency errors, which are reported in the bottom status bar as a scan progresses. See the figure below for an example warning.

Inconsistency warning. Try increasing packet delay.
5.2. Stage Controls
You can move the stage manually by clicking on the Jog Stage buttons, located on the tool bar of SpectrononPro. The buttons will move the stage incrementally in either direction. Use the buttons to center the stage underneath the Pika imaging spectrometer.

Jog Stage buttons located on the tool bar
Further control of the stage can be controlled from two windows: the Stage tab in the Tools Panel, and the
Preferences window (accessed by File Preferences).
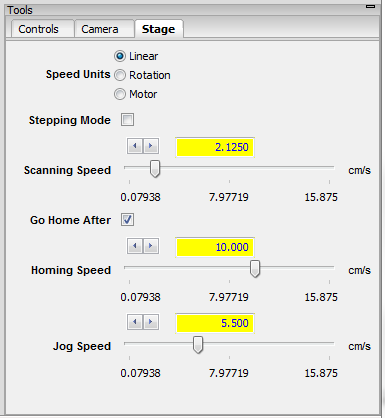
Stage tab in Tools Panel
Speed Units is a setting used for different types of stages. Linear is used for the standard linear translation stage that is installed on most benchtop systems. Rotation is used for a tripod-mounted rotational scanning stage, typically used in outdoor applications. Motor displays speed in “motor pulses per second.”
Stepping Mode controls the way the stage moves in relation to the imager, and is ideal for very slow scanning, very long integration times, or to guarantee there is no motion blur in your scan.
Scanning Speed is the linear speed of the stage during a scan.
If the Go Home After box is checked the stage will return to its starting position after a scan. The speed at which the stage returns to its original position is the Homing Speed, and the Jog Speed is used for the Jog Stage buttons, described above.
5.3. Additional Controls
5.3.1. Scanner Preference Tab
The Scanner tab allows you to set the binning options for recording your datacubes. These options are useful for situations where you wish to reduce the size of collected datacubes or where you wish to improve your signal-to-noise ratio. This tab also allows you to select the correct camera for Spectronon to search for. For example the Pika L and Pika XC2 use a Basler camera.
The Spectral Bin option indicates how many spectral channels to bin. For many situations, this is your best choice to reduce the size of your datacubes and to improve your signal-to-noise ratio, as the spectral resolution is often higher than needed. With the Pika II, a spectral bin of 3 will result in 80 spectral bands (240 / 3).
The Spatial Bin option indicates how many spatial channels to bin. This option is typically useful when imaging an object known to be largely homogeneous.
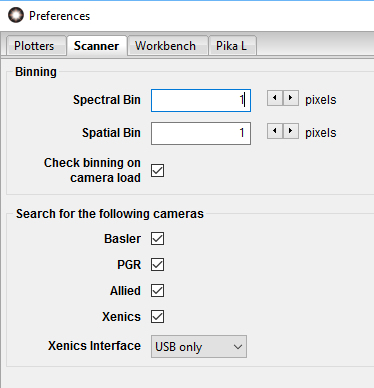
Scanner tab in the Preferences window
Note
The Bin options listed above performs an average of the binned pixels. This allows you to directly compare binned and un-binned data.
5.3.2. Workbench Preference Tab
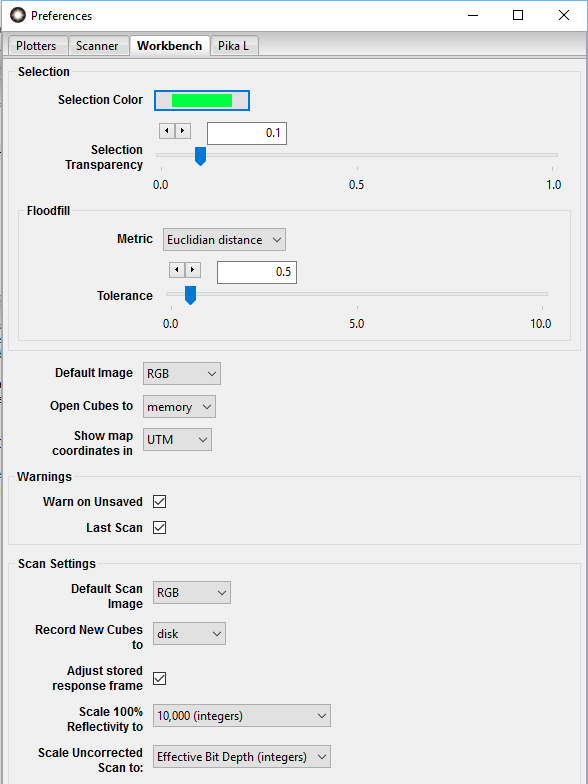
Workbench tab in the Preferences window
The Selection options relate to visualizing selected regions of datacubes.
The Floodfill options relate to the flood fill (wand)  tool located on the menu bar, which is
used to select a contiguous region of spectrally similar pixels. After selecting a region
with either the marquee
tool located on the menu bar, which is
used to select a contiguous region of spectrally similar pixels. After selecting a region
with either the marquee  or lasso
  , right-click to reveal a pop-up
menu with several options. Holding control while
selecting ROIs allows you to append to the existing selection. Metric options are either Euclidean or
Spectral Angle Mapper (SAM), and Tolerance is a unitless parameter that determines the
sensitivity of Floodfill.
, right-click to reveal a pop-up
menu with several options. Holding control while
selecting ROIs allows you to append to the existing selection. Metric options are either Euclidean or
Spectral Angle Mapper (SAM), and Tolerance is a unitless parameter that determines the
sensitivity of Floodfill.
Default Image and Open Cubes pertain to opening existing datacubes. The options for Default Image are to open the image from your datacubes in a Red Green Blue (RGB) representation, or as a single grayscale image. The Open Cubes options are either to memory or disk. The memory option is faster, but may not work well for computers with limited memory.
When checked, the Warn on Unsaved option will provide you with a warning message that you have not saved your last scan when closing the software. Similarly, when clicked, the Last Scan option will provide you with a warning message that your previous scan will be overwritten by your next scan if you have not already saved it.
The Default Scan Image option allows you to set whether your scanned image is displayed as a Red Green Blue (RGB) image or as a grayscale image. This setting does NOT impact the hyperspectral data itself; it only changes how the image of the data is presented in the image panel.
The Recording option allows you to record your scans into computer memory or directly to disk. Recording to memory is faster and preferred unless your data acquisition computer does not have sufficient memory for your scans. Be sure to click on the Set button if you change this setting.
The Scale 100% Reflectivity to option allows you to record reflectance scaled to 1.0 (floats), 10,000 (integers), and Effective Bit Depth (integers). This process will scale the brightness of your reference sample to the option you choose. This saves your data as a standard reflectance value IF you use a reference sample with a reflectivity of 1. (Spectralon is a good material for this, and Teflon is a less expensive and reasonable substitute reference material, although less accurate.) If you use the 1.0 (floats) option, each channel of data will require 4 bytes instead of 2. Thus, the size of your datacube will double with Float as compared to not using this option.
The Scale Uncorrected Scan to: option allows you to scale the raw data taken with your imager to Effective Bit Depth (integers) or 1.0 (floats). We recommend using the Effective Bit Depth unless you require the other option.
Note
The use of Uncorrected above refers to the user not using the Dark Current  or Response Correction
  plug-ins prior to collecting a datacube. You would do this if you wanted to collect raw data and convert it to Radiance using radiometric calibration data provided by Resonon. Prior to converting, raw data is in digital number (DN).
5.3.3. Spectrometer Menu
The Spectrometer Main Menu button provides alternative approaches to useful actions, as well as some timesaving options.
The Detect Imager option will prompt Spectronon software to detect an imager. This option allows you to detect an imager that perhaps was not plugged in when Spectronon was initially opened.
The Reload Imager option will restart the Pika imager without restarting SpectrononPro software. This option will save you time if you have, for example, accidentally disconnected your Pika spectrometer or crashed the software.
The Reload Stage option will restart your scanning stage without restarting SpectrononPro software. This option saves you time if your stage needs to be restarted.
The Auto Exposure option allows you to let the software set the exposure
setting for your lighting conditions. To use this, place an object within the
field of view of your Pika, and then click on Auto Exposure. Alternatively,
you can use the Exposure button from the toolbar.
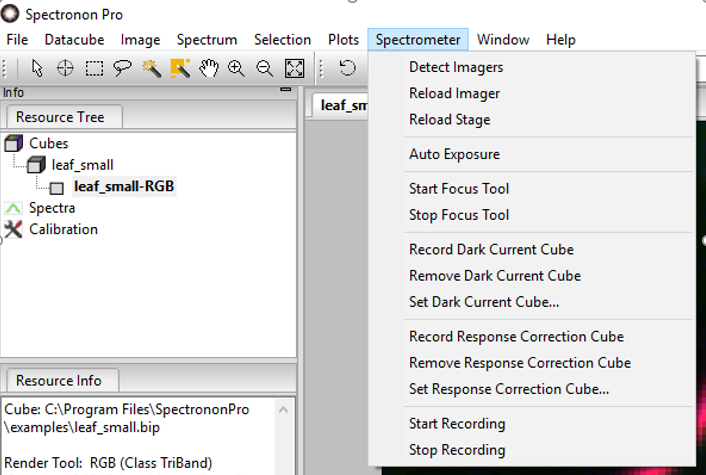
Spectrometer menu
The Start Focus Tool option will provide you with a live view from your Pika
imager in the image panel. This tool is useful for adjusting the focus of your
objective lens or checking the illumination of your system. You can also start
the focus tool by clicking on the Focus button on the
SpectrononPro tools bar, as described in Chapter 5.
The Stop Focus Tool option turns off the live view, which you need to do
before you record a scan. The last live view will remain in a tab of the image
panel. Another way to turn off the live view is to click the Focus button
, which toggles live view off and on.
The Record Dark Current Cube is used to remove dark current noise from the
imager. When you select this option you will be instructed to block the imager
and then click OK. Another way to do this is select the
Dark Current button on the SpectrononPro toolbar.
The Remove Dark Current Cube option will remove your dark current
calibration cube. This will also remove the red check from the Dark Current
button  .
.
The Set Dark Current Cube… allows you to import a saved dark current correction cube. This option is rarely utilized.
The Record Response Correction Cube option allows you to use a reference
material against which all measurements will be scaled. Typically this is done
with a reference material whose reflectivity is approximately equal to 1. When
you select this option, you will be instructed to place a reference material
within the imager’s field of view, and then click on OK. A small reference
cube will then be recorded and used for scaling the data to the bit-level of
the camera. (E.g., for the Pika II, 12-bits, or 4096, and for the Pika NIR,
14-bits or 16,384.) If you have selected Normalize to Float, as described
above, the data with the scaled to 1 rather than the bit level of the camera.
Another way to perform this function is to use the Response Correction Cube
button on the SpectrononPro toolbar.
The Remove Response Correction Cube will remove the existing response
correction cube. This will also remove the red check from the Response
Correction Cube button  .
.
The Set Response Correction Cube… allows you to import a saved reference cube. This option is rarely utilized, as one should generally record a correction cube regularly and with the current lighting to obtain accurate results.
The Start Recording and Stop Recording options will start and stop a
scan with your Pika imaging spectrometer. This can also be done using the
Scan Button  on the SpectrononPro toolbar. The Scan Button
will toggle Start and Stop functions.
on the SpectrononPro toolbar. The Scan Button
will toggle Start and Stop functions.